If you have a list of customers who have asked to not be emailed in a spreadsheet or other CRM tool, import the information into NCR Customer Connect. The opt-out status and date will be associated with any NCR Counterpoint email addresses.
Click here for instructions on how to build a Do Not Mail list.
Click here for instructions on how to import a Do Not Mail list from Constant Contact.
Click here for instructions on how to delete improperly sourced lists (purchased, copied, etc).
How to build a Do Not Mail list:
1. Navigate to the Manage/Lists tab.
2. Under the Upload New List section, click on the Click to download a sample list in Do Not Mail Format. This opens a sample copy of the Do Not Mail list.
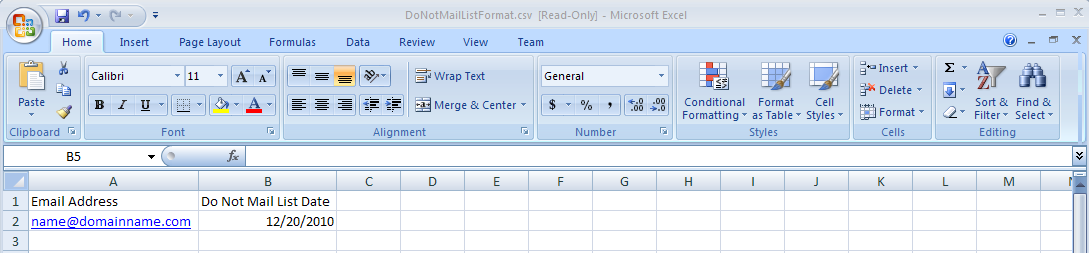
3. Open the file and populate the 2 columns available: Email Address & Do Not Mail List Date. If the Do Not Mail List Date is left empty, the opt-out date will be set to the date the import occurs.
Here's an example of how it should look:
4. Choose to save the file on your system. Name and save the file in CSV (comma delimited) format.
5. Under Upload Contacts enter a descriptive List Name (ex: Do Not Mail List 1).
6. Select the Do Not Mail radio button.
7. Click Browse to navigate to the file saved on step 4 above.
8. Click on the UPLOAD button. The following confirmation window will appear:
"Do Not Mail lists will mark all included contacts as opted out.
Are you sure you want these contacts to no longer receive emails?"
Answer OK if you are importing a Do Not Mail list. You will receive a message stating "File Uploaded Successfully. Contacts are currently loading. You will receive an email when complete."
All contacts from the Do Not Mail list that match your NCR Customer Connect contacts will be updated with an Opt Out date, marking these contacts as Do Not Mail. An email cannot be sent to these contacts, unless they subscribe or opt back into your newsletter/business.
9. After receiving the email stating the upload was successful, navigate to Manage/Contacts and sort by Opt Out date by clicking on the Opt Out column. This will help you visually verify the list that was imported succesfully.
Return to Top
How to import a Do Not Mail list from Constant Contact:
1. Log into Constant Contact and navigate to the Contacts tab and select Export at the top.
2. Change Contact List: to Do Not Mail List.
3. Check the Add/Remove Date field only.
4. Click on the Export as CSV button, then name and save the file to a location on your system (remember this location so you can retrieve the file later).
5. In NCR Customer Connect, select the Manage/Lists tab.
6. Under Upload New List enter a descriptive List Name (ex: Do Not Mail list 1).
7. Select the Do Not Mail radio button.
8. Click Browse to navigate to the file saved on step 4 above.
9. Click on the UPLOAD button. The following confirmation window will appear:
"Do Not Mail lists will mark all included contacts as opted out.
Are you sure you want these contacts to no longer receive emails?"
Answer OK if you are importing a Do Not Mail list. You will receive a message stating "File Uploaded Successfully. Contacts are currently loading. You will receive an email when complete."
All contacts from the Do No Mail list that match your NCR Customer Connect contacts will be updated with an Opt Out date, marking these contacts as Do Not Mail. An email cannot be sent to these contacts, unless they subscribe or opt back into your newsletter/business.
10. After receiving the email stating the upload was successful, navigate to Manage/Contacts and sort by Opt Out date by clicking on the Opt Out column. This will help you visually verify the list was imported successfully.
Return to Top
How to delete improperly sourced lists (purchased, copied, etc.)
1. Navigate to the Manage/Lists tab.
2. Under the Upload New List section, select the Do Not Mail radio button.
3. Click Browse to navigate to the improperly sourced file.
4. Click on the UPLOAD button. The following confirmation window will appear:
"Do Not Mail lists will mark all included contacts as opted out.
Are you sure you want these contacts to no longer receive emails?"
Answer OK if you are importing a Do Not Mail list. You will receive a message stating "File Uploaded Successfully. Contacts are currently loading. You will receive an email when complete."
All contacts from the Do No Mail list that match your NCR Customer Connect contacts will be updated with an Opt Out date, marking these contacts as Do Not Mail. An email cannot be sent to these contacts, unless they subscribe or opt back into your newsletter/business.
5. After receiving the email stating the upload was successful, navigate to Manage/Contacts and sort by Opt Out date by clicking on the Opt Out column. This will help you visually verify the list was imported successfully.
Return to Top