Click on the appropriate
NCR Counterpoint version for instructions on these settings.
SQL or
V7
NCR Counterpoint SQL Instructions:
Capture Email Addresses at the Register Using the Simplified Customer Add-On-The-Fly FormThis simplified form will help you connect with your customer easily while ringing up a sale. To enable the simplified Customer Add-On-The-Fly form, in NCR Counterpoint, select Setup/Customers/Control, then select the Other tab and check the box for Simplified customer add-on-the-fly and save the setting.
Consider what type of data you really need to gather and train your cashiers to ask for this data:
- To save time during checkout, you may decide to only capture the required fields and email address
- If you would like to include personalization on your emails, make sure to capture First name and Last name
- If you need to ship to this customer, send direct mail or segment based on address fields, then be sure to ask for the postal address.
NCR Customer Connect also allows you to segment on Customer Category and Profile Code. Consider setting up categories and profile codes that can help you to target your emails more effectively. Category can be easily assigned on this simplified form. If you don't need certain fields, don't ask the cashier to gather them.

In NCR Counterpoint SQL version 8.4.3 and above if a customer does not want to receive marketing emails from NCR Customer Connect, you can select the Opt-out from marketing emails check box. Checking this box will exclude the customer from all NCR Customer Connect mailings. This box is unchecked by default, allowing you to email all NCR Counterpoint customers who have an email address associated to them.
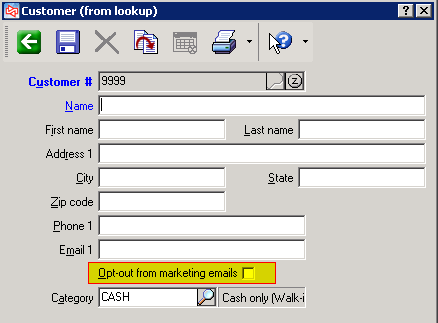
Note: If you upgrade to NCR Counterpoint SQL V8.4.3 from Counterpoint V7.5.14 or later, the Opt-out from marketing emails check box will be set appropriately for each customer, based on the Market? setting for each customer in Counterpoint V7.
Counterpoint V7 Instructions:
Capture Email Addresses at the Register Using he Simplified Customer Add-On-The-Fly Form
This form will help you connect with your customer easily while ringing up a sale.
To enable the Customer Add-On-The-Fly form:
1. In Counterpoint, select Setup/System/Users, select a User ID and press enter, to complete user selection.
2. Press enter to move onto the next page.
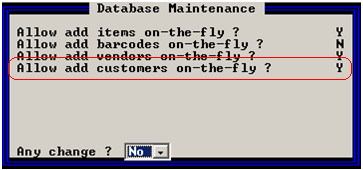
3. Under Authorizations, select 10. Database Maintenance and change 'Allow add customers on-the-fly?' to Y.
4. Steps 1-3 need to be repeated for each Point of Sale User that needs access to adding customers on-the-fly during ticket entry.
Consider what type of data you really need to gather and train your cashiers to ask for this data:
- To save time during checkout, you may decide to only capture the required fields and email address
- If you would like to include personalization on your emails, make sure to capture first & last name by pressing F2=Enter a person's name to change the Name entry line to First name & Last name.
- If you need to ship to this customer, send direct mail or segment based on address fields, then be sure to ask for the postal address.
- NCR Customer Connect also allows you to segment on Customer Category. Consider setting up categories that can help you to target your emails more effectively. Category can be easily assigned on this form.
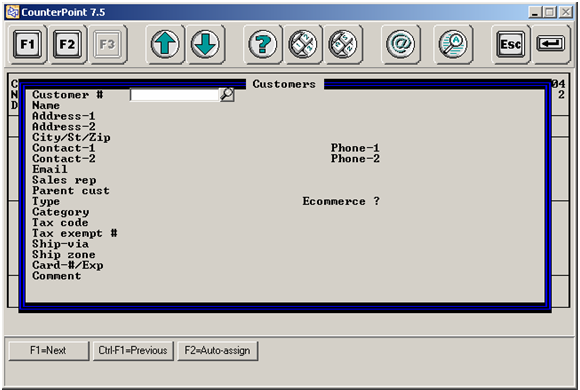
If you don't need certain fields, don't ask the cashier to gather them. Here's an example of what the Customer add-on-the-fly screen looks like on the Point of Sale.
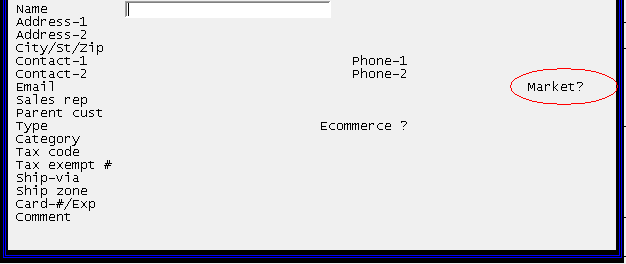
After entering the customer's email address a flag labeled Market?, appears to the right. This flag is used to input whether the customer wants to receive email marketing newsletters. If they choose not to receive marketing emails, select NO. This data is communicated to NCR Customer Connect in the next data export and determines whether the customer receives emails from your business. The default setting is Yes, allowing you to email all Counterpoint customers who have an email address associated to them. Here's a sample of what the screen looks like:
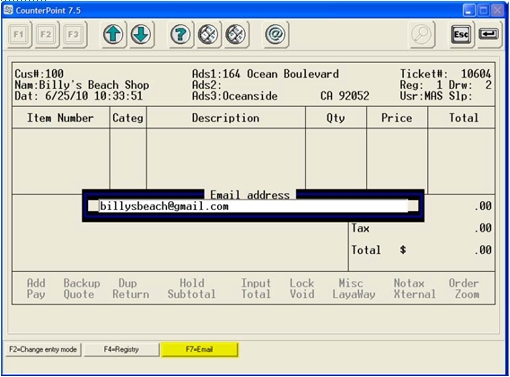
If using Counterpoint V7.5.18 or later, adding or editing a customer email address "on the fly" is even easier. In this version, when you select a customer in Ticket Entry, you can now add an e-mail address to the customer record or edit the customer’s existing e-mail address “on the fly.” This feature allows you to easily capture a customer’s e-mail address when you are entering a ticket.
To add or edit a customer’s e-mail address in Ticket Entry, select the customer normally, press F7 (or click the F7=Email button), and then enter or modify the customer’s e-mail address in the Email address window.
The e-mail address you specify is saved to the customer record for future use.
Note: Users must be authorized to edit customer records (i.e., the Edit customer record ? Point of Sale authorization in Setup > System > Users must be set to Yes) to be able to add or edit a customer’s e-mail address in Ticket Entry.
Note: If you upgrade to NCR Counterpoint SQL V8.4.3 from Counterpoint V7.5.14 or later, the Opt-out from marketing emails check box (in V8.4.3) will be set appropriately for each customer, based on the Market? setting for each customer in Counterpoint V7.