If you have more than one store, the Manage/Variables page provides you the ability to create custom variables for each store. This is quite helpful when building your email content.
Before describing how to setup custom variables, here's an example of WHEN you may use custom variables.
I have 4 stores and each store has slightly different hours and days of operation.
1 - I create custom variable(s) on the Manage/Variables page, then add/modify store specific values for the stores whose hours/days of operation are slightly different.
2 - When I create an email I can apply my custom variable(s) to Campaigns Step 2 (the email subject line) and/or Step 6 (the email content), when applicable. On either step, select the Insert Variables link and select Custom Variables to apply the variable(s) created.
3 -When I reach Campaigns Step 8, I send the email. Recipients of my email will see the variable(s) populated with data relevant to the store they visit. Note: If a customer visits more than 1 of my stores, they will receive data relevant to the most recent store visited.
--------------------------------------------------------------------------------------------------------------------------**Merchants, who follow a corporate/franchise model, need to contact support for additional setup information prior to using the Manage/Variables page. Contact support at [email protected] and include the words corporate/franchise in the subject line. In the body of the email provide any details that will help us determine your needs. --------------------------------------------------------------------------------------------------------------------------
The following is HOW to setup a custom variable for the example described above, step by step.
1 - Navigate to the Manage/Variables tab, where you will find the following image.
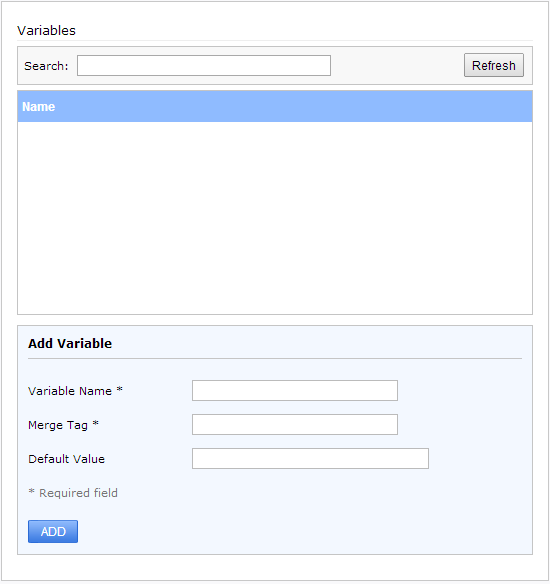
2 - Enter the following data:
Variable Name* - This data is required. Enter a descriptive name; for example, Store Hours.
Merge Tag* - This data is required and very helpful when building emails. Enter how you'd like the variable to appear in your email subject and/or content. For example, storehours which appears as ##STOREHOURS## in the email subject and/or content, when applied.
Note: If you had previously entered variables on the Manage/Variables page, it's likely those merge tags are named ##VARIABLE_1##, ##VARIABLE_2##, etc. Deleting or changing these merge tags are not recommended, because it will break them in older emails. It's best to create duplicates of older variables and input new merge tags to use in future emails. Using the most recent variables in future emails will ensure they're labeled descriptively.
Default Value - This data is not required, but it's purpose is to prevent emails from having blank variables. If the default value is left blank, you must populate the value for each store. If neither is populated, emails that use this variable will include nothing in its place which may make the email look incomplete. For our example we'll use 9am-6pm Mon-Sat, Closed Sun.
3 - Select Add on the Add Variable window; the following appears.
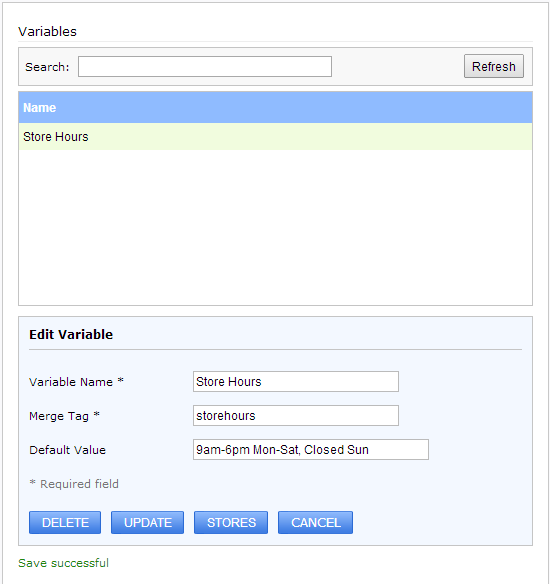
4 - Select Stores, found at the bottom of the page; the following appears.

5 - To create unique values for each store, click on a store whose value you’d like to change/update. For our example, select Store Number GZ0001.

6 - Populate
Value with the correct store hours for this location and select
Save.
Notice the Store Value column is updated with the value provided. Emails received by GZ0001 will see it's variables value and not the default value.
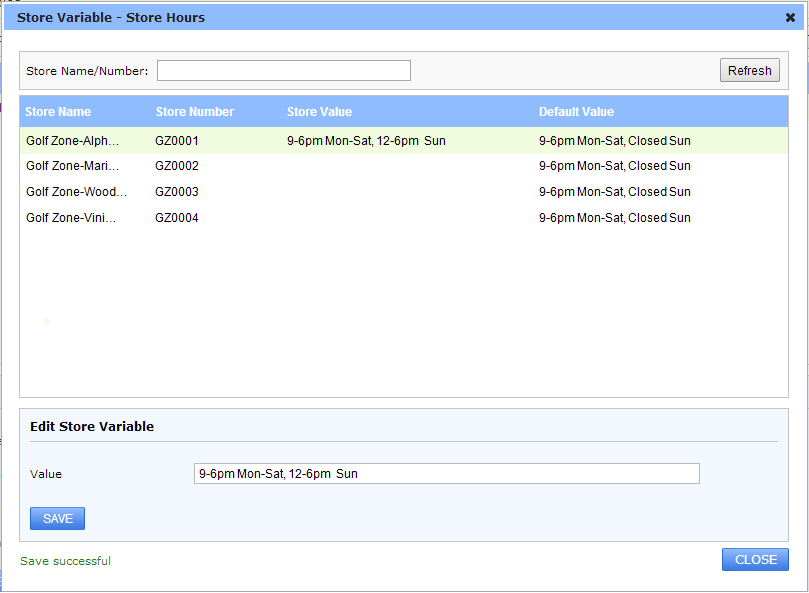
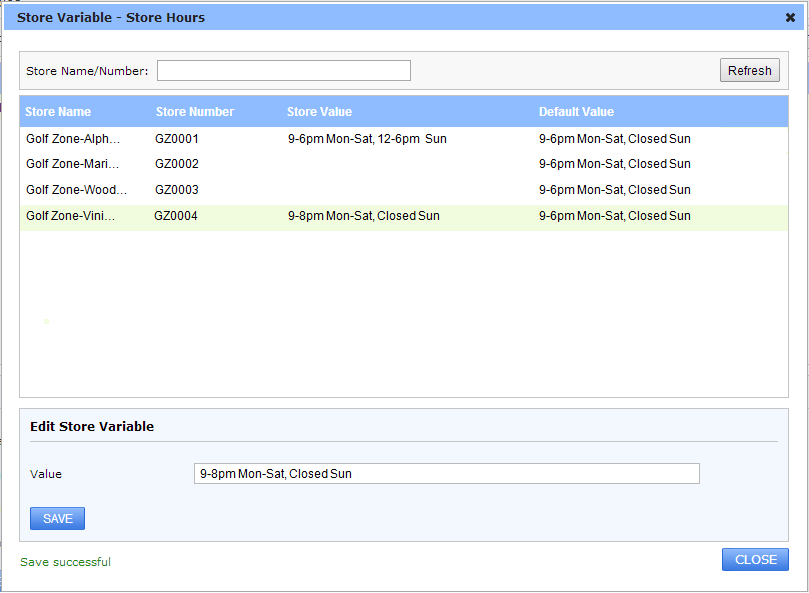
7 - Repeat 5 & 6 for all applicable stores. In our example, 2 stores have a different value than the default value (GZ0001 & GZ0004).
8 - When complete, select Close to close the Store Variable window. The Edit Variables window appears only when highlighting a variable name on the page.
This Edit Variable window consists of 4 options:Delete - Deletes the variable listed. It's safe to delete variables that have never been applied to an email. Though, deleting a variable that's being used within an email will break the variable.
Update - Saves changes applied to the variable name, merge tag or default value.
Stores - Opens the Store Variable window, so you may add a unique value for each store (if applicable).
Cancel - Closes the Edit Variable window, so you may add new variables.
To apply your new custom variable(s) to the subject line or content of an email, navigate to Campaigns Step 2 (the email subject line) and/or Step 6 (the email content). On either step, select the Insert Variables link then choose Custom Variables and select a variable you created. Complete all campaign steps to send the email.