Item Groups are an alternative way to group items that are not already grouped, like item categories. They are applied during segment creation on Campaigns/Step 4 using one of the following segments:

2nd drop down – select item group created on Manage/Item Groups page
3rd drop down – select Yes/No

2nd drop down – select item group created on Manage/Item Groups page
3rd drop down – select >, <, =, >= or <=
4th drop down – input number of days
Prior to the item group feature, item related segments relied on item and customer categories or ticket item number or description. You may find your inventory sometimes isn't setup to easily target particular customers; so item groups were created to provide an alternative way to group like and unlike items.
Item Groups can be:
- Added – As provided in the example below (review example for details).
Note: To add additional item groups you must deselect any group names highlighted in the top half of the page. To deselect a group name you must choose the Cancel button, found in the bottom half of the page. If the Cancel button is not present, you are ready to create a new item group; start with step 2 below.
- Deleted – Highlight the group name you’d like to delete, located in the top half of the page, and select Delete.
Note: Item groups included in a segment, on Campaigns/Step 4, cannot be deleted. You must delete the segment prior to deleting the group name.
- Updated – Highlight the group name you’d like to apply item updates to. Type in the item number or description for the item you’d like to add. Once the new items are added to the Selected Items list, use the Update button to update that particular Item Group.
Note: Item Groups may be renamed using the Update button as well.
- Canceled – Choose the Cancel button to cancel the current action or to deselect a highlighted Group Name.
- Filtered
* * * * * * * * * * * * * * * * * * * * * * * * * * * * * * * * * * * * * * * * * * * * * * * * * * * * * * * * * * * * * * * * * * * * * * * * * * *
How to Add your first Item Group (Example):
You own a vitamin store which includes vitamins and supplements for health, energy, weight loss, and more. Each product is categorized differently in Counterpoint (some by brand, others by health concern, etc). You would like to remind customers who purchased a 30 day supply of vitamins/supplements that it's time to reorder their product so they never miss a day.
- To begin, navigate to Manage/Item Groups
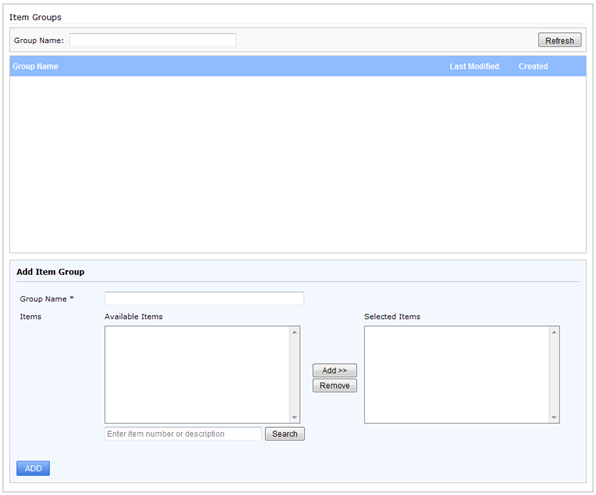
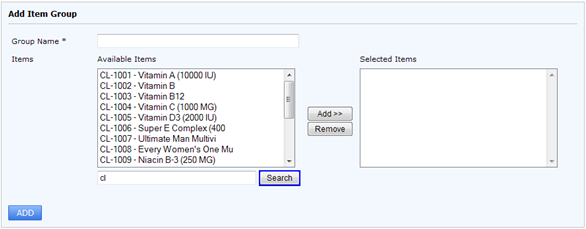
- In the box labeled Enter item number or description, enter the item number or description for the item(s) you’d like to include in this group and select the Search button. Items that match the search criteria will be populated in the Available Items window.
Note:
- After entering an item number/description, you must press the Search button to populate the Available Items window.
- The items displayed in the Available Items window filters on items that have been purchased in the last 90 days. So, if the item you’re searching for has not been purchased by anyone in the last 90 days, it will not be displayed on the Available Items window.
- Entering nothing in the item number/description and pressing Search displays 50 items purchased in the last 90 days, in numerical/alphabetical order.
- The maximum number of items displayed in the window is 50.
- When the item(s) you'd like to group are displayed in the Available Items window, select it and click Add>>, located on the center of the page. This adds the item(s) to the Selected Items window.
Note: Multiple items may be selected at one time for both the Available & Selected Items window. To do so, hold the Shift or Ctrl key when selecting the items.
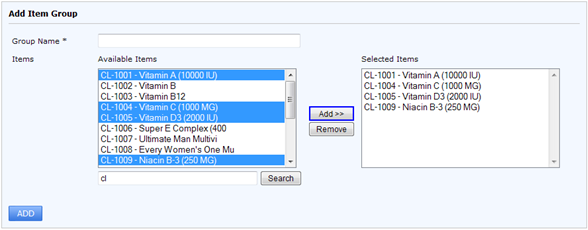
- Repeat steps 2 & 3 until all the items you’d like to group are in the Selected Items window.
- Enter a Group Name for the items selected and choose the blue ADD button, located on the bottom left side. For this example, let's make the group name 30 day supply.
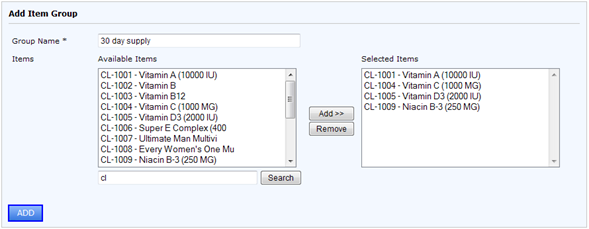
- After creating your first item group, the group name appears in the top section of the page and is highlighted. At this time you may:
- add more items to the highlighted item group by following steps 2 & 3 above and choose Update when you're done
- create new items groups. To create a new item group you must select Cancel to deselect the highlighted group name. Follow steps 2-6 to create a new item group.
- click Cancel if you are finished with creating item groups. Cancel deselects the highlighted group name. Now you can navigate to another tab.

- Next, apply the item group(s) to an email. Navigate to the Campaigns tab and start building an email. Let's send an email to customers who have purchased items in the item group created (30 day supply). On Campaigns/Step 4, select New Segment and use the drop down box to find Days Since Purchase In Item Group and choose the following:

This targets customers who purchased the selected items in this item group 20 days ago. The email created reminds these customers their vitamins/supplements need to be replenished soon.
Note:
- This segment is most useful for items that need to be reordered after a particular time period, for example: vitamins, warranties, shoes, batteries, etc.
You could also use the same item group in another email using the following segment:
Send an email using this segment to reach anyone who has purchased the selected items in this item group. The email may contain information about an available discount if they buy more than 2 vitamin/supplement products during their next visit.
Note:
- Adding more rules to either segment may help more with targeting customers you want to reach.For example you could also apply:
or
or any other segment available.
- Target customers who meet the segment criteria are not limited to 90 days.