Please review the entire article before enabling this feature. If you have any questions, please contact support at [email protected].
Enabling the Confirmed Opt-In feature requires all contacts who subscribe to your business to confirm their subscription before they are added to your mailing list.
Important Notes:
- Businesses located in Canada must enable this feature to adhere to the Canadian Anti-Spam Law (CASL), to avoid future fines. CASL allows Canadian enforcement against spammers operating in Canada.
- If your business is not located in Canada, you're not required to use this feature but it has many advantages (provided below).
There are two emails associated to the Confirmed Opt-In feature, once it's been enabled.
- Confirm Email - This email is automatically sent to new contacts who subscribe to your business. It includes a confirm subscription button which must be selected by the subscriber so they are added to your mailing list. This gives you permission to send them email. The confirm email doesn't have an expiration date, so contacts may select the confirm subscription button at any time in the future to be added to your mailing list. Confirm Email Process details are provided below.
- Reconfirm Email - This email is similar to the confirm email, as it includes a confirm subscription button. Though, it is not sent automatically; instead, use the Manage/Contacts page to select which contacts receive the email. This feature enables two new buttons on the Manage/Contacts page, Reconfirm and Reconfirm All, to be used during the Reconfirm Email Process. Reconfirm Email Process details are provided below.
Important Note - To adhere to the Canadian Anti-Spam Law:
- Businesses located in Canada must immediately send a reconfirm email to all contacts in their current mailing list, after enabling Confirmed Opt-In. This will prevent multiple emails being sent to new contacts.
- Businesses located outside of Canada may send the reconfirm email to assist in cleaning their mailing list, but it is not required.
- A reconfirm email can only be sent one time per contact. Allowing additional messages to unconfirmed contacts, including another copy of the reconfirm email, is considered spam by Internet Service Providers (ISPs) and may get your business blacklisted.
- If a reconfirm email is sent to ALL contacts, it cannot be sent to those contacts again.
- If a reconfirm email is sent to a SELECTED group of contacts, you may send it to contacts that were not selected earlier.
Confirm Email Process
1. A contact (customer/prospect) subscribes to your business through:
-
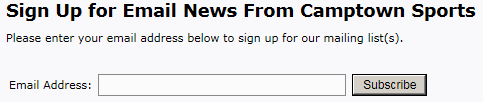
- Web opt-in (by subscribing on your web page) - which directs them to a new page (sample provided below) asking them to check their email to confirm their subscription.
Sample of web opt-in:
Sample of the new page contacts are directed to:

- Counterpoint (by providing their email address during checkout)
- Other means - if email addresses are captured at a sidewalk sale or in other ways, these addresses are uploaded into NCR Customer Connect using a .CSV file on the Manage/Lists page.
2. The contact receives a confirm email requesting they confirm their subscription (email subject: Confirm your subscription).
-
- If they subscribed by web opt-in, the confirm email is sent within an hour.
- If they subscribed through Counterpoint or Other means, the confirm email is sent within 24 hours. Important Note: Cashiers need to be trained to tell customers to check their inboxes after 24 hours to confirm their subscription to the business.
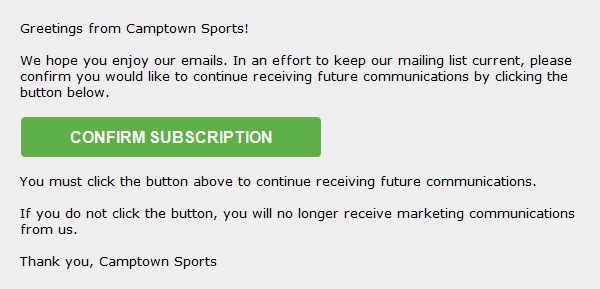
Sample Confirm Email:
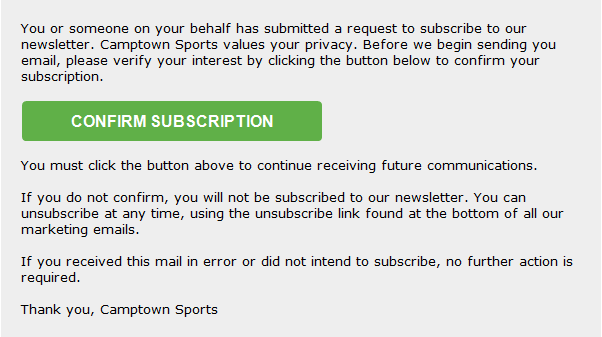
3. The contact opens and views the confirm email in their inbox and selects the confirm subscription button (seen in the image above).
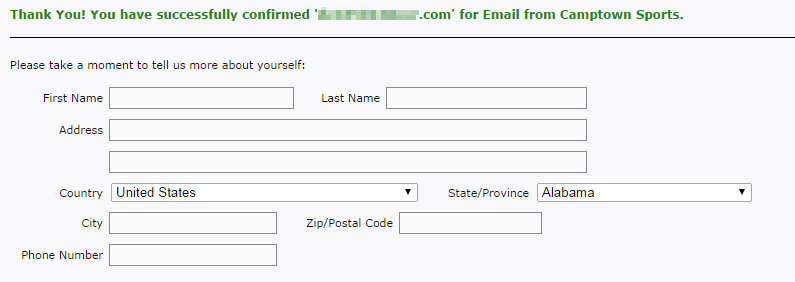
Selecting the confirm subscription button directs them to a new page confirming their successful subscription (see image below). This page may or may not include the long subscribe form (which asks for first name, last name, address, etc.), it depends on the subscribe option applied to your website.
Sample of success message:
4. The contact is added to your mailing list and you may send them email.
Click here for details on editing/updating the Confirm Email.
Return to Top
Reconfirm Email Process
Enabling the Confirmed Opt-In feature grandfathers all current contacts by populating their Confirm date with the date the feature is enabled. This allows you to continue sending email to these contacts.
If your business is located in Canada, you must send the reconfirm email to all current contacts to adhere to the Canadian Anti-Spam Law (CASL).
The reconfirm email:
- Provides you a method to re-ask contacts for their explicit consent to send them future emails. This assists with adhering to the CASL.
- Is useful in removing contacts from old mailing lists or those who have not shopped at your business in the past 5 years.
Follow these steps to send a reconfirm email to current contacts.
1. Navigate to the Manage/Contacts page, to view contacts.
2. Determine who to send the reconfirm email to (all contacts or a target group). Use contact filters to help you, located at the top of the page (type, status, list, segment, etc.).
- If you choose all contacts, use Type=(All) and Status=Active.
- If you choose a target group, use List or Segment filters to assist with selecting the contacts you'd like to target. Examples of a target group are contacts who are on an old mailing list or who haven't shopped at your business in the last 5 years, etc.
Note: If you don't have an existing list/segment, for the group of contacts you'd like to target, you will need to create the list/segment and then navigate back to the Manage/Contacts page.
3. Place a check mark next to the contact(s) you'd like to send the reconfirm email to, if not sending to all contacts.
4. Select the Reconfirm button to choose the checked contacts only.
Select the Reconfirm All button to choose all contacts listed on all pages (in this case there's no need to check each record individually). Note: Selecting Reconfirm or Reconfirm All, removes the contacts Confirm date.
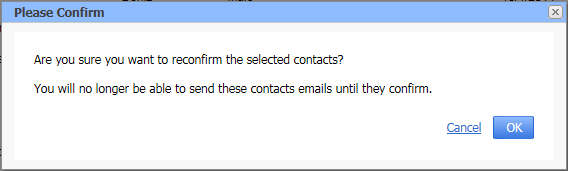
5. A Please Confirm window appears asking if you're sure about your selection. If it's correct, choose OK and a reconfirm email is sent to the selected contacts.
Important Notes:
- A reconfirm email can only be sent one time per contact. Allowing additional messages to unconfirmed contacts, including another copy of the reconfirm email, is considered spam by Internet Service Providers (ISPs) and may get your business blacklisted.
- If a reconfirm email is sent to ALL contacts, it cannot be sent to those contacts again.
- If a reconfirm email is sent to a SELECTED group of contacts, you may send it to contacts that were not selected earlier.
- Sending a reconfirm email to contacts will cause a decrease in your Active contact count/status, until the contact selects the confirm subscription button. These contacts can be found under the Unconfirmed status until they become Active again.
- All contacts may not confirm their subscription. Don't worry because those contacts were likely affecting your campaign results because they were not opening/interested in your emails. Contacts that confirm their subscription are interested in your business and emails and directly contribute to your campaign results.
Sample Please Confirm window:
Sample Reconfirm Email:
Click here for details on editing/updating the Reconfirm Email.
Return to Top
HOW TO ENABLE CONFIRMED OPT-IN
Navigate to the Manage/Subscribe Options page and select the Enable button, under the Confirmed Opt-In section.

Default content has been provided for both the Confirm and Reconfirm emails and may be modified at any time. Click here for details on editing/updating these emails.
Important Notes:
- After enabling the Confirmed Opt-In feature, all contacts currently in NCR Customer Connect are grandfathered in and the contact's Confirm date is populated with the date the feature was enabled. This allows you to continue sending email to these contacts.
- If the Confirmed Opt-In feature is enabled then disabled, all contacts that have not selected the confirm subscription button (within their confirm/reconfirm email) are opted out. If they select the confirm subscription button in the future or re-subscribe, they will be added to your mailing list/opted in. Email cannot be sent to contacts that are opted out.
- A reconfirm email can only be sent one time per contact. Allowing additional messages to unconfirmed contacts, including another copy of the reconfirm email, is considered spam by Internet Service Providers (ISPs) and may get your business blacklisted.
- If a reconfirm email is sent to ALL contacts, it cannot be sent to those contacts again.
- If a reconfirm email is sent to a SELECTED group of contacts, you may send it to contacts that were not selected earlier.
- A confirm email may be sent multiple times because the contact has requested it by subscribing multiple times. For example, a new contact subscribes to your business:
- and never selects the confirm subscription button. If they subscribe again, a new confirm email is sent to the email address provided because they never confirmed their subscription.
- and selects the confirm subscription button. If they subscribe again, a new confirm email is not sent because they already confirmed their subscription. Instead, the contact sees a screen similar to the sample success message below. This allows the contact to modify the data originally entered when they confirmed their subscription.
Return to Top
RESULTS
To track contacts who have confirmed their subscription review the Confirm column on the Manage/Contacts page. These are contacts who clicked on the CONFIRM SUBSCRIPTION button, found in the confirm and reconfirm emails.
Note: The Confirm column is only available when the Confirmed Opt-In feature is enabled.
To track contacts who have not confirmed their subscription filter contacts by Status: Unconfirmed on the Manage/Contacts page.
You may export contacts to .CSV/.PDF, to keep a copy of confirmed contacts on file.
Return to Top
FEATURE ADVANTAGES & DISADVANTAGES
ADVANTAGES
- Avoid fines by adhering to the Canadian Anti-Spam Law.
- Better quality mailing list - cleans up your list so you're only sending email to those who want it, which helps decrease your chance of being blacklisted.
- Response rates increase/higher engagement (more opens & clicks) because those receiving your email want it.
- Fewer unsubscribes and spam complaints, which may assist in creating a good reputation among ESPs (Email Service Providers) and a better reputation helps increase deliverability.
- Invalid email addresses are not added to your mailing list, causing less bounces. Invalid addresses are sometimes created when typos occur during the subscription process.
- Accidental subscriptions are not added to your mailing list.
- Prevents prank email subscriptions - with confirmed opt-in, the contact must confirm their subscription through the email address provided before you can begin sending them email.
- Customers must have a valid email address to subscribe.
DISADVANTAGES
- Your mailing list grows more slowly, due to subscribers who may not follow through and confirm their subscription.
- You are unable to email contacts who do not select the confirm subscription button within their confirm/reconfirm email. These contacts will not appear in your mailing list.
- The confirm/reconfirm email may get delivered to the customers junk folder so they never confirm their subscription. Though, Customer Connect includes a message on the subscription landing page telling contacts to check their "bulk" and "junk" email folders if they don't see the email in their inbox.
Return to Top
PROOF OF CONSENT
TBD - The contact's IP address is captured when they confirm their subscription, allowing you to provide proof of consent. To view this information navigate to Manage/Contacts and filter for the contacts you'd like to view then export the list to .CSV or .PDF format. The exported list includes Confirm Date & Confirm IP.