Two-way communication allows you to notify Counterpoint of an invalid email address, during check out (available in Counterpoint 8.3.7 and above). This gives the Counterpoint user an opportunity to capture the correct email address for future emails.
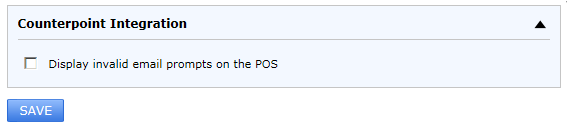
Activate this option by navigating to the Manage/Advanced page, in Customer Connect, and select the box labeled "Display invalid email prompts on the POS", then choose SAVE.
After activating this feature and data has been communicated, the following note is displayed in Counterpoint during check out, if a customer has an invalid email address.
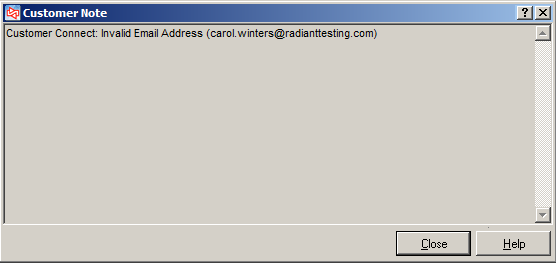
The Counterpoint user may close this window and ask the customer for a new email address and update it.
This particular customer note can be found on:
- The POS during checkout, as mentioned above
- And within the customer record by navigating to Main Menu/Customers/Customers in Counterpoint, click on the Note icon, enter Note ID = AUTO and press enter.
Important Notes:
- The customer note is not deleted automatically. The Counterpoint user must manually delete the customer note. If not deleted, the "invalid email address..." customer note is displayed each time the customer record is selected, even after the email address has been corrected.
- Customer notes are not populated for customers who have opted out/unsubscribed from emails.
How to Delete Customer Notes
There are three options to delete customer notes.
- In Counterpoint, navigate to Main Menu/Customers/Customers; click on the customer note icon, enter Note ID = AUTO and press enter. Find the note you'd like to delete and choose the delete customer note icon, which looks like a red X. This option may be difficult to complete if a long line of customers are checking out, since the user must navigate away from the POS to complete it.
- If the Counterpoint POS is using a long customer form (non-simplified customer add-on-the-fly form), users already have access to customer notes when editing the customer's record, from the POS. While viewing the customer record, select the customer note icon, enter Note ID = AUTO and press enter. Find the note you'd like to delete and choose the delete customer note icon, which looks like a red X.
- If the Counterpoint POS is using a simplified customer add-on-the-fly form, a partner will need to configure the following so users have access to customer notes from the simplified customer add-on-the-fly form. This allows users to navigate to the notes quicker, so notes regarding an invalid email address may be deleted. After the option is configured, the user has access to customer notes when editing the customer's record from the POS. While viewing the customer record, select the customer note icon/word (whatever is setup by the partner), scroll through the notes to find the one you want to delete and choose the delete customer note icon, which looks like a red X.
Partner Instructions: (This information may also be found in Counterpoint under Help, search on actions.xml.)
Use Counterpoint SQL's standard Customize toolbar functionality to add a button for customer notes, to the custom add-on-the-fly form's toolbar.
First, make the window you want to display available from the custom toolbar action. To do this add the following XML tags to the actions.xml file in the Actions subdirectory below the company's Configuration directory (e.g., C:\Program Files (X86)\Radiant Systems\Counterpoint\CPSQL.1\TopLevel\<CompanyAlias>\Configuration), substituting the name of the window you want to display in the action id tag and the menu ID in the filetorun tag. Here's an example for CustomerNotes:
<action id="CustomerNotes" actiontype="menu">
<filetorun>TFRMCUSTOMERNOTES</filetorun>
<parameters/>
<caption>Customer Notes</caption>
<image/>
<hint>Customer Notes</hint>
<shortcut/>
</action>
After modifying the company's actions.xml file, you must exit and restart Counterpoint SQL for the new custom toolbar actions to be available.
Once you have made the standard maintenance window available as a custom toolbar action, you can right-click the title bar of the simplified customer add-on-the-fly form, select Customize toolbar, navigate to the Custom category, and add the new action to the window's toolbar in the normal manner.
Click here to learn more about two-way communication.