NCR Counterpoint customer profile codes allow you to capture important information about your customer that can be used to send relevant, targeted emails to your customers. Sending relevant messages, instead of general blasts, will increase your customer loyalty and reduce the number of complaints you will receive on your email campaigns. High loyalty and low complaint rates are the two most important factors in maximizing profits from your email marketing efforts.
NCR Counterpoint customer profile codes allow you to be creative with your messages and make the most of NCR Customer Connect’s set & forget email campaigns. In NCR Counterpoint, set up profile codes that are relevant to your business and your customers. Encourage your employees to create customer records for every customer. Capture email addresses and values for profile codes. Then you can use that data to create powerful NCR Customer Connect campaigns. Here are just a few examples of what you can do:
- Collect birth dates in a date profile code and set up a recurring campaign to automatically send a birthday greeting email.
- Collect customer gender. Send messages with topics relevant to women to females and topics for men to males.
- Be creative about information that is valuable for your own business and products:
- A pet store can create a profile code for "Type of Pet" (dog, cat, bird, lizard, etc). Send targeted emails for owners of a certain type of pet.
- A jewelry store can create a profile code for "Birthstone" (sapphire, emerald, ruby, etc). Send targeted emails advertising relevant jewelry.
- A shoe or sporting goods store can create a profile code for favorite brand of tennis shoe. Send targeted emails for new products by that brand.
Follow these steps to put profile codes to work for you in NCR Counterpoint and NCR Customer Connect:1. Check if you are already using customer profile codes - NCR Counterpoint SQL
If you are already using customer profile codes, you will want to:
- Check that you have descriptive field labels for your profile codes. Click here for help with entering descriptive labels in NCR Counterpoint SQL
- Review the data you have collected before building your NCR Customer Connect segments. Run a customer report to view the data that has already been captured. This will help you to create rules that will match your data.
2. Add or edit customer profile codes - NCR Counterpoint SQL
3. Create targeted segments in NCR Customer Connect using your profile codes - NCR Counterpoint SQL
Click here to view other segment types.
NCR Counterpoint SQL
1. Instructions on how to check if you're using customer profile codes
In NCR Counterpoint, navigate to Customers / Customers. Review an existing customer record and check for the Profiles tab. If one exists, click on the tab to view the customer profiles in use. These customer profile codes are available for segmenting in NCR Customer Connect.
Return to Top
NCR Counterpoint SQL
2. Instructions on how to add or edit customer profile codes
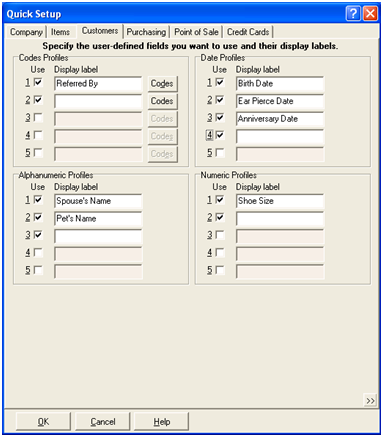
In NCR Counterpoint, navigate to Setup / System / Quick Setup and click on the Customers tab, here's a sample of what it looks like when customer profiles are NOT in use (notice no check boxes are selected):
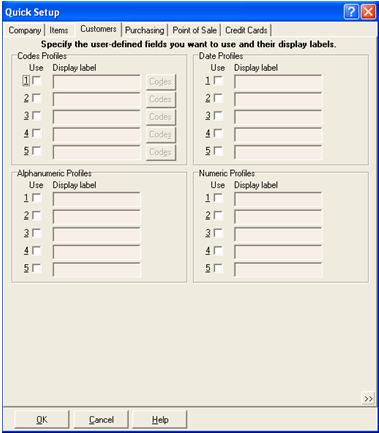
Twenty user-defined fields are available for “profiling” each customer. Each of these fields can contain a separate piece of information about your customer, such as birthday or favorite color. Train your employees to capture this data from your customers by editing the Customers / Customers / Profiles screen in NCR Counterpoint.
The first step in creating customer profile codes is to determine what sort of information you want to record. Then decide the entry type needed for the data you want to gather (codes, alphanumeric, date, or numeric data).
To start using a profile code click the Use check box to the left of the profile code, to turn it on. Then enter a Display label for each one selected.
Using Codes Profiles
Codes Profiles help you to control the values entered for the data. This is preferred over just using a more general data type, like alphanumeric, because it is easier to create segmentation rules for data that is consistent. For example, if you want to capture a customer’s gender use a Code Profile to limit the data entered to “Male” and Female”.
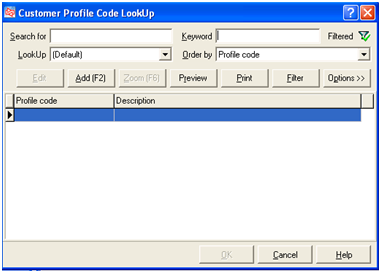
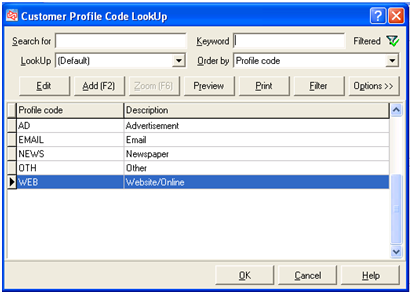
As an example, we will create a Codes Profile to capture data about how a customer was referred to your store. To add codes for the Referred By label, you must press the Codes button. This opens the Customer Profile Code Lookup screen.
Press F2 Add to add codes for this profile entry. Enter the Profile Code and Description and click save icon.
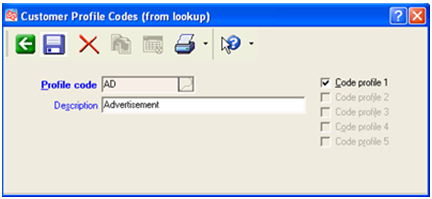
Here is what it looks like after adding all the code options available for Referred By:
Return to Top
NCR Counterpoint SQL
3. Instructions on how to use customer profile codes in NCR Customer Connect.
Segmenting by customer profile code
Plan an email campaign that will take advantage of a profile code segment. Within the campaign, navigate to Step 4 (Select Recipients).
1st drop down box - choose whether you want to use "AND" or "OR" - this is needed if you plan to use more than one rule to create your segment.
2nd drop down box - select Profile Code
3rd drop down box - choose which profile code you want to segment on. All the profile codes that you have set up and turned on in NCR Counterpoint will display in this list.
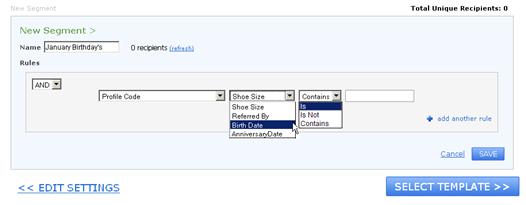
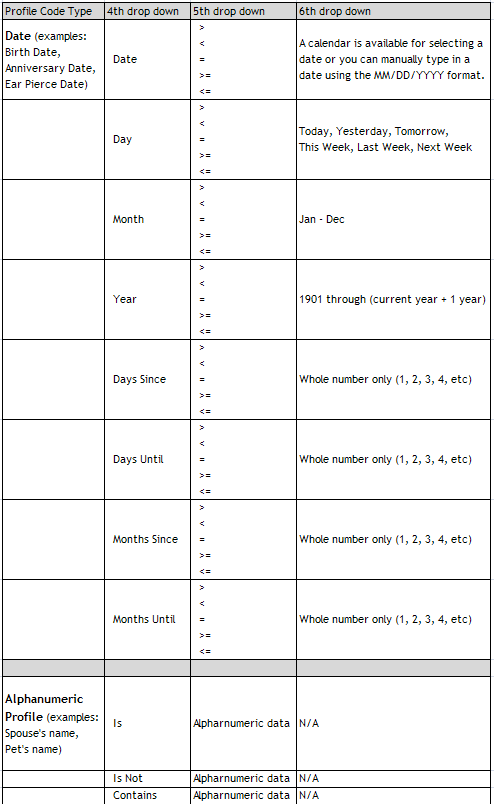
Additional drop down boxes will display, based on the data type of the profile code selected. For example:
Creative Segments
Profile Code Data stored as ALPHANUMERIC
You need to be very careful when creating segments using alphanumeric data. You must know what data you have stored in NCR Counterpoint. For instance, if you are capturing Gender in an alphanumeric profile, your data may contain all of these values: m, f, male, female, man, woman, boy, girl. It might even contain data with typos: grl, mle, fml.
Once you know what your data looks like, you can decide if you want to clean up your data or create multiple rules to make sure you capture all of the relevant customers.
Example: To send an email about a sale on women’s shoes, create multiple rules to cover all of the permutations of data in your system:
OR – Profile Code Gender Is f
OR – Profile Code Gender Is female
OR – Profile Code Gender Is woman
OR – Profile Code Gender Is girl
IMPORTANT: Any customer with data that does NOT match f, female, woman or girl will NOT be included in the segment.
Profile Code Data stored as DATE
Example: Send a one-time offer to any customer who pierced their ears over Thanksgiving weekend, giving them an offer for 15% off earrings. Create the following segment rules:
AND – Profile Code Ear Pierce Date Date > 11/26/2010
AND – Profile Code Ear Pierce Date Date < 11/29/2010
Example: Send an email to everyone whose Birth Date month is January and give them a coupon for 5% off all items in the store. Create the following segment rule:
AND – Profile Code Birth Date Month = January
Example: Send a set & forget email to remind people who pierced their ears in the last 2 months, to call and make an appointment to have their piercing rechecked for free. Create the following segment rule:
AND – Profile Code Ear Pierce Date Months Since = 2
Example: This segment allows you to do date math. Send a daily set & forget email to remind people their loyalty points expire in 30 days. Creating the following segment rule looks to see if the profile code 'Loyalty Pt Exp Date' is 30 days from today. If it's true, send an email.
AND - Profile Code Loyalty Pt Exp Date Days Until = 30
Example: Send a daily set & forget email and give customers a birthday coupon 1 week before their birth date.
AND - Profile Code Birth Date Days Until = 7
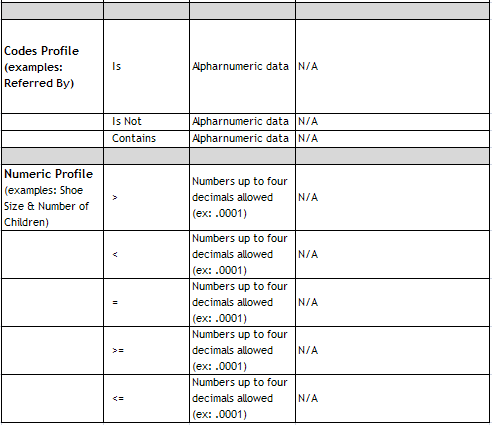
Profile Code Data stored as CODES
Data stored as Codes means the data entered for this particular profile has a lookup code associated to it. In our sample data Referred By has 5 different codes that could be selected by the employee when ringing out the customer. Here is an example.
Example: To send an email to the people who heard about you in the newspaper and made their first purchase within the last 7 days, create your rules like this:
AND – Profile Code Referred By Is Newspaper
AND – Days Since First Purchase <= 7
Profile Code Data stored as NUMBERS:
When creating segments for profile codes stored as numbers, the number allows up to four decimals (ex: .0001).
Example: To advertise a sale on men shoes for sizes 11 or larger, create the following segment rules:
AND – Profile Code Gender Is male
AND – Profile Code Shoe Size >= 11.0000
Return to Top
Instructions on how to add descriptive display labels
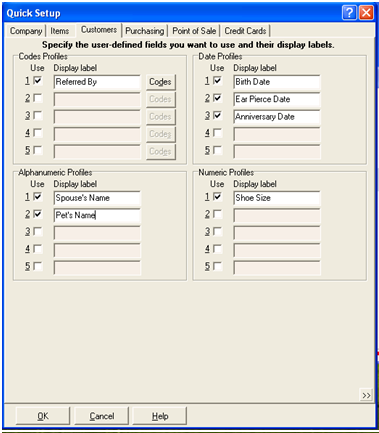
Working with profile codes in NCR Counterpoint and NCR Customer Connect is much easier if you use descriptive display labels. In the following example you will notice eleven profile codes are selected for use, but only seven of them have display labels. The other four will be displayed in NCR Counterpoint and NCR Customer Connect as Code Profile 2, Date Profile 4, Alpha Profile 3, and Numeric Profile 2.
Uncheck any profile codes that do not have a display label or enter a descriptive display label to utilize them. Click OK when you have finished profile code setup. Navigate to Customers / Customers, Profiles tab to verify all your profile codes are displayed.
Return to Top