This tab is used to setup and manage your default settings. Each section on this tab can be expanded or collapsed. If a section is not populated it will be expanded, giving you the opportunity to fill in missing data.
Updates made to the Email Sender, Email Footer, Whitelist, Social Medial - Follow Us, Social Media - Share & Advanced sections are applied to all emails when the Use Default Email Settings option is selected on Campaigns/Step 3.
Email Sender
The company's name, email address, physical address, etc is entered here. It can be setup on the Manage/Defaults & Campaigns/Step 3 tabs.
Email Footer
This section consists of the Permission Reminder and the Mandatory Unsubscribe Message. It can be setup on the Manage/Defaults & Campaign/Step 3 tabs.
The Whitelist message asks contacts to add your business email address to their address book, to ensure deliverability of your emails to their inbox. This section can be setup on the Manage/Defaults & Campaign/Step 3 tabs. Click here for information on how to change the location of whitelist message.
Social Media - Follow Us
Choose the location of the
Follow link(s) and enter the social media URL links (Facebook, Twitter & You Tube) you want to apply to your emails. This section can be setup on the
Manage/Defaults &
Campaign/Step 3 tabs.
Click here for information on how to use this feature.
Social Media - Share
Choose the location of the
Share link(s) and change the share message if wanted. This section can be setup on the
Manage/Defaults &
Campaign/Step 3 tabs.
Click here for information on how to use this feature.
Social Media - Auto Post
Connect to Facebook and/or Twitter to begin using the Auto Post to Social Media feature. Help articles regarding how to connect to these social media sites are available by clicking on the (i) icons, found in this section. This section can only be setup on the Manage/Defaults tab. Click here for details on how to connect and how to use the Auto Post feature.
Advanced
This section allows you to choose the location of the "view as webpage" link and can be setup on the Manage/Defaults & Campaign/Step 3 tabs and is applied to all emails. Click here for more information.
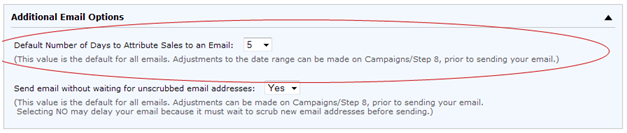
Additional Email Options
There are two options in this section where default values are setup. The default value may be changed on an email by email basis on Campaign/Step 8 if needed. This section can only be setup on the Manage/Defaults tab.
- Default Number of Days to Attribute Sales to an Email - This option:
- is preset to 10 - which means sales are attributed to the email from the email send date + 10 days
- is applied to all emails
- can be decreased/increased from 1 to 31 days
- is used to pre-populate the Sales Date Range on Campaigns/Step 8, but can be changed prior to sending/scheduling your email
For example, if you would like to regularly attribute sales up to 5 days from the email send date, change the default number to 5. See setup example here:
Click here for instructions and examples on how to modify the Sales Date(s) attributed to an email on Campaigns/Step 8.
- Send email without waiting for unscrubbed email addresses - This option defaults to YES and assists with minimizing the delay of an email, by excluding recipients whose email address has not been scrubbed. Scrubbing continues on the addresses so future emails can be sent to those contacts. Note: Scrubbing is a process that verifies if a new email address is a known, good and active. This option can be setup on the Manage/Defaults tab and Campaigns/Step 8. Click here for details.
An Address Scrubber tool can also be found on the Dashboard. The tool displays the percentage of email addresses scrubbed within NCR Customer Connect. For additional information, click here.
When to use the Manage/Defaults tab to change Email Settings
- If you just registered for NCR Customer Connect, navigate to this tab to enter your Company's Email Settings. This information will be applied to all emails created.
- If you are a current user of NCR Customer Connect, navigate to this tab to quickly enter any Email Settings that have changed since you first entered these settings. Changing the data here applies your changes to all emails where the Use Default Email Settings box is selected on Campaigns/Step 3 (which can be applied to current, future and recurring emails already scheduled).
Note: If you choose to resend a non-recurring email (created before 6/5/11), the email setting defaults will not be applied.
They can easily be applied by selecting or checking the Use Default Email Settings option (on Step 3).
- A confirmation window appears stating, "This will restore your default settings and ensure that any changes to the defaults will automatically be applied to this email. Do you wish to continue?".
- Select OK if you'd like to apply the default settings.
- Select Cancel if you choose not to apply the default settings to the email. If you choose to Cancel, please review the email settings on Step 3 and make any modifications that are needed for this email and choose Save My Changes when complete.
When to use Campaigns/Step 3 to change Email SettingsIf changes are needed to the Email Settings while building a campaign, Step 3 is the best place to make these changes; making it easy to navigate through the campaign building process.
- To make changes to grayed out sections on Step 3, you must uncheck the Use Default Email Settings box, located on the top left side.
- Expand the section that needs modifying and make the necessary changes.
- When complete, select either Save My Changes or Save As Default Email Settings.
Save My Changes - located on the top right above the yellow help box, are for temporary changes being made for the email you're currently creating. These changes will be applied to the current email only. Auto saves on this page are the same as selecting this option.
Save As Default Email Settings - located on the top right below the yellow help box, is used when the changes being made should be applied to all emails where the Use Default Email Settings box is selected on Step 3. Be careful when making this selection, all changes will be applied to current, future and recurring emails already scheduled.
Note: If you choose Save As Default Email Settings, the following confirmation window appears "These changes will apply to all emails using default email settings. Do you wish to continue?".
- If you choose OK, all sections are grayed out and fully populated sections collapse.
- When a section is grayed out, the information cannot be changed.
Anytime Save As Default Email Settings is selected and confirmed, the Manage/Defaults tab is updated with your changes too.
Return to Top
Here are some examples to help explain these options:
This is quite useful for merchants who own two different stores. For example, a merchant may own a landscaping business and a pet store. If more email is sent to the customers of the landscaping business then the default email settings should reflect the landscaping business' company name, street address, email address, etc (found on the Manage/Defaults tab). Anytime an email is created for customers of the landscaping business the merchant can skip entering data on Campaigns/Step 3, because the default email settings are automatically applied.
Note: If you view Step 3, you'll see the Use Default Email Settings box is selected. This checkbox determines whether the default email setting are automatically applied or not.
If an email is created for customers of the pet store, the merchant will need to review Campaigns/Step 3 to manually enter new email settings; because the company name, address, etc of the pet store is different from the landscaping business (which is the default). The changes made only apply to this one email, so Save My Changes should be selected.
This is also useful for merchants who own one type of store, but may want to change the Reply-to Email address for one particular email so replies from this email go to a different address instead of the default. To make this change they would review Step 3 of the Campaign, uncheck the Use Default Email Settings box, navigate to and expand the Email Sender section, change the Reply-to Email address, and press Save My Changes.
Return to Top